Federating Kubernetes Workloads with Cloud Identities


Your K8s workloads legitimately need access to sensitive cloud resources – federated identities let you grant it easily and securely.
When using a managed Kubernetes (K8s) service like AWS’s EKS, Azure’s AKS or Google Cloud’s GKE, a common requirement is to give access to certain cloud resources in the Kubernetes workload, such as a storage or database.
As with many things in life, there is a right and a wrong way to do this.
For operational reasons, you may be tempted to use permanent credentials stored as a secret in your K8s cluster, your code or some other plaintext artifact. Using such artifacts to provide access is extremely risky. Even when you exercise caution, permanent credentials tend to leak, potentially enabling malicious actors to access sensitive resources in your environment.
Fortunately, AWS, Azure and GCP now have mechanisms for federating K8s workloads to identities within the cloud environment (for example, in AWS, an IAM role) and using the identity to access the relevant resources. You can do this using the OpenID Connect (OIDC) authentication protocol, in which the K8s cluster functions as the OIDC issuer and is configured as an OIDC provider in the CSP.
Using identity federation obviates the need to manage credentials for the workloads and is the recommended best practice for this kind of requirement. Note that once you do the setup, giving access to cloud resources is easier to manage and more secure.
If you haven’t previously set up identity federation for K8s workloads, the process may seem intimidating. In fact, it’s easier than you think. To help, we have created a cheat sheet (which summarizes several lengthy tutorials to which we added references) of practical steps for performing identity federation when you have a K8s cluster set up (or are already experienced in setting one up).
We will now explain how to set up identity federation for K8s clusters across the three major cloud providers.
AWS Elastic Cloud Kubernetes (EKS)
Note: Kudos to Rderik for their comprehensive walkthrough of using AWS IAM roles for Kubernetes. We have sourced (and slightly modified) artifacts from the procedure they describe.
Step 1 - Obtain the OIDC issuer ID from the EKS cluster
export CLUSTER_NAME=<K8S_CLUSTER_NAME>
echo $(aws eks describe-cluster --name ${CLUSTER_NAME} --query "cluster.identity.oidc.issuer" --output text)
The output should be in the following format:
https://oidc.eks.<AWS_REGION>.amazonaws.com/id/<OIDC_ISSUER_ID>
We’ll use this value in the next step.
Step 2 - Create an OIDC provider
Now that you have the OIDC identifier, you need to create an OIDC provider to create trust with it. Using Terraform, the code will look something like this:
locals {
 oidc_issuer = "https://oidc.eks.<AWS_REGION>.amazonaws.com/id/<OIDC_ISSUER_ID>"
}
data "tls_certificate" "cluster" {
 url = local.oidc_issuer
}
resource "aws_iam_openid_connect_provider" "cluster" {
 client_id_list  = ["sts.amazonaws.com"]
 thumbprint_list = [data.tls_certificate.cluster.certificates.0.sha1_fingerprint]
 url = local.oidc_issuer
}
You should supplement <OIDC_ISSUER_ID> with the value received in the last step.
If you want to create the OIDC (identity) provider using the console, the provider URL will be oidc_issuer value and the audience will be sts.amazonaws.com - as shown in Figure 1:
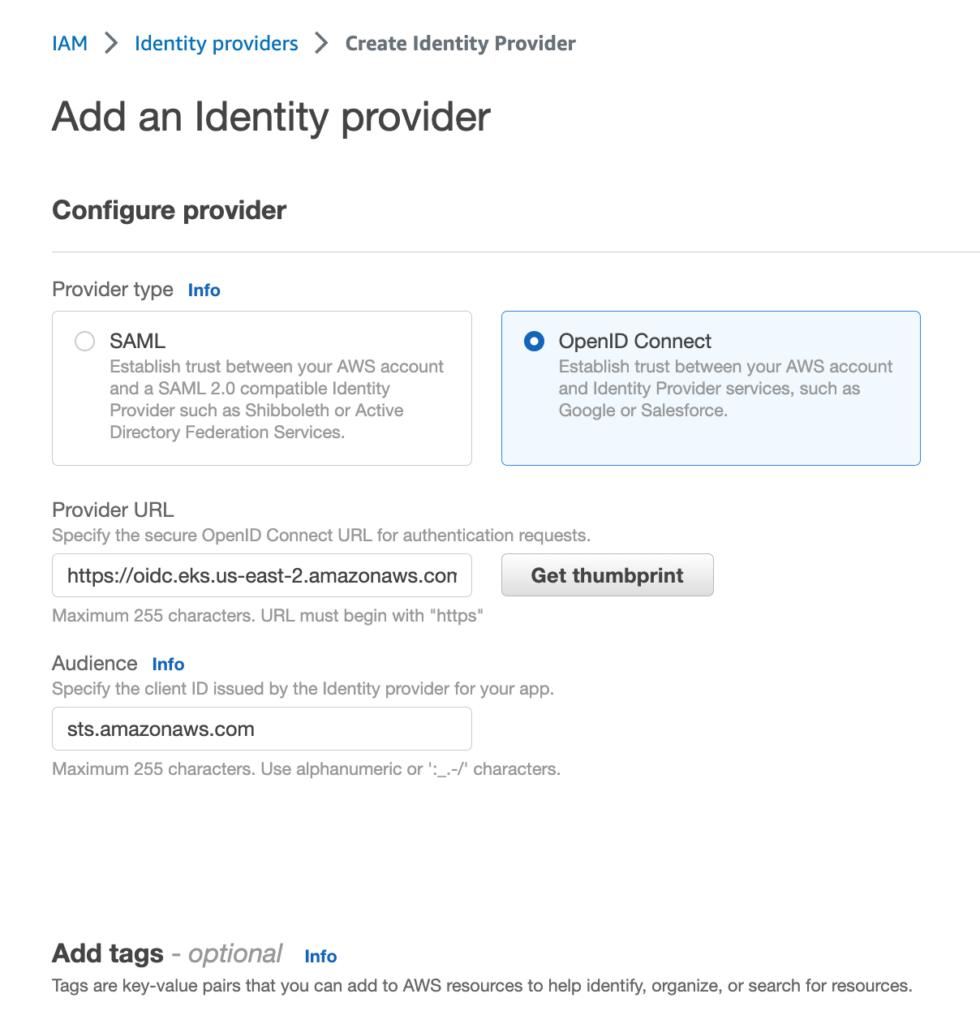
Figure 1 - Creating an OIDC provider for the EKS cluster in the console
Step 3 - Create an IAM role
Next, create an IAM role to which the service account in the K8s cluster can refer.
What makes it possible for the IAM role to enable this functionality is, of course, its trust relationship policy. The Rderik guide has done a great job of defining this policy in its Terraform example, which we have slightly modified:
locals {
 cluster_namespace = "default"
 service_account_name = "web-app-service-account"
}
data "aws_region" "current" {}
data "aws_caller_identity" "current" {}
resource "aws_iam_role" "pod_sa" {
 name = "eks-test-role"
 assume_role_policy = data.aws_iam_policy_document.pod_sa_assume_role_policy.json
}
data "aws_iam_policy_document" "pod_sa_assume_role_policy" {
 statement {
   effect  = "Allow"
   actions = ["sts:AssumeRoleWithWebIdentity"]
   principals {
     type        = "Federated"
     identifiers = ["arn:aws:iam::${data.aws_caller_identity.current.account_id}:oidc-provider/${replace(local.oidc_issuer, "https://", "")}"]
   }
   condition {
     test     = "StringEquals"
     variable = "${replace(local.oidc_issuer, "https://", "")}:aud"
     values = ["sts.amazonaws.com"]
   }
   condition {
     test     = "StringEquals"
     variable = "${replace(local.oidc_issuer, "https://", "")}:sub"
     values = ["system:serviceaccount:${local.cluster_namespace}:${local.service_account_name}"]
   }
 }
}
There are a few things to note here. First, that the principal federated is the OIDC provider we created in the previous step. Also, to make sure the role assumption is done not only strictly on behalf of the Kubernetes cluster but also for the specific service account we specified under service_account_name (find IAM condition keys explained here), we condition the AssumeRole action on the values of the “<OIDC_ISSUER>:aud” and “<OIDC_ISSUER>:sub” keys.
Be sure to attach IAM policies to the IAM role that specify the access permissions you want to grant the K8s workload.
Step 4 - Annotate the service account
Once the federation is established, create a service account annotated with reference to the IAM role. The service account will have the name specified in the condition placed in the IAM role trust relationship in the previous step.
An example of creating and annotating the service account will look something like this:
apiVersion: v1
kind: ServiceAccount
metadata:
 name: web-app-service-account
 annotations:
   eks.amazonaws.com/role-arn: "arn:aws:iam::<ACCOUNT_ID>:role/<IAM_ROLE_NAME>"
With <IAM_ROLE_NAME> being the name of the IAM role created in the previous step.
Now the service account in the K8s cluster can make calls to AWS resources and you will have access to the permissions attached to the IAM role.
Azure Kubernetes Service (AKS)
Last year, Azure announced Azure AD workload identity, which replaced a mechanism called Azure AD pod identity that had served the purpose of federating pods to Azure subscriptions. Recently, Microsoft published this tutorial, which walks you through testing usage of an Azure AD workload identity for your application. Let’s review its core steps.
Step 0 - Get the preview workload identity feature
This feature is still in preview, so before using it make sure you understand its availability and support conditions. As a first step, install the aks-preview Azure CLI extension:
az extension add --name aks-preview
az extension update --name aks-preview
Next, register the 'EnableWorkloadIdentityPreview' feature flag:
az feature register --namespace "Microsoft.ContainerService" --name "EnableWorkloadIdentityPreview"Then wait a few minutes (it can take a while, so be patient) for the status to show Registered. You can look it up every couple of minutes using the following command:
az feature show --namespace "Microsoft.ContainerService" --name "EnableWorkloadIdentityPreview"Once the flag is registered, refresh the registration of the Microsoft.ContainerService resource provider:
az provider register --namespace Microsoft.ContainerServiceBefore we move on, as these setup instructions are mostly in bash, it’s easiest to use variables to store values used in commands:
export CLUSTER_NANE=<YOUR_CLUSTER_NAME>
export RESOURCE_GROUP_NAME=<CLUSTER_RESOURCE_GROUP_NAME>
export NODE_COUNT=<NEEDED_NODE_COUNT>
Step 1 - Enable the OIDC issuer and workload identity on your cluster
Run:
az aks update -n ${CLUSTER_NANE} -g ${RESOURCE_GROUP_NAME} --enable-oidc-issuer --enable-workload-identityIf you’re creating a new cluster, use these flags:
az aks create -g ${RESOURCE_GROUP_NAME} -n ${CLUSTER_NANE} --node-count ${NODE_COUNT} --enable-oidc-issuer --enable-workload-identity --generate-ssh-keysStep 2 - Get the OIDC issuer ID for your AKS cluster
Do so like this:
export AKS_OIDC_ISSUER="$(az aks show -n ${CLUSTER_NANE} -g ${RESOURCE_GROUP_NAME} --query "oidcIssuerProfile.issuerUrl" -otsv)"Step 3 - Create a user managed identity for the K8s service account to use
Here are the variables you need:
export MANAGED_IDENTITY_NAME=<NAME_FOR_THE_MANAGED_IDENTITY>
export LOCATION=<DESIRED_LOCATION>
export SUBSCRIPTION_ID=<CLUSTER_SUBSCRIPTION_ID>
Similar to the IAM role we used in the AWS example, in Azure, use a user- assigned managed identity. You can create it using this command:
az identity create --name ${MANAGED_IDENTITY_NAME} --resource-group ${RESOURCE_GROUP_NAME} --location ${LOCATION} --subscription ${SUBSCRIPTION_ID}Provide this identity the permissions to which you want the Kubernetes workloads federated with your Azure environment to have access.
Next, extract the ID for this identity (we will use the ID in step 5):
export USER_ASSIGNED_CLIENT_ID="$(az identity show --resource-group ${RESOURCE_GROUP_NAME} --name ${MANAGED_IDENTITY_NAME} --query 'clientId' -otsv)"Step 4 - Establish a federated identity credential
Here are the variables you need:
export SERVICE_ACCOUNT_NAMESPACE=<NAMESPACE_OF_SA_FEDERATED>
export SERVICE_ACCOUNT_NAME=<NAME_OF_SA_FEDERATED>
export FIC_ID=<NAME_OF_YOUR_CHOICE_FOR_FEDERATION>
Use this command:
az identity federated-credential create --name ${FIC_ID} --identity-name ${MANAGED_IDENTITY_NAME} --resource-group ${RESOURCE_GROUP_NAME} --issuer ${AKS_OIDC_ISSUER} --subject system:serviceaccount:${SERVICE_ACCOUNT_NAMESPACE}:${SERVICE_ACCOUNT_NAME}Step 5 - Annotate the service account
Finally, create a service account in the namespace using the name specified in the previous step. Its manifest will look like this:
apiVersion: v1
kind: ServiceAccount
metadata:
  annotations:
    azure.workload.identity/client-id: <USER_ASSIGNED_CLIENT_ID>
  labels:
    azure.workload.identity/use: "true"
  name: <SERVICE_ACCOUNT_NAME>
  namespace: <SERVICE_ACCOUNT_NAMESPACE>
(You will need to supplement the <SERVICE_ACCOUNT_NAME>, <SERVICE_ACCOUNT_NAMESPACE> and the USER_ASSIGNED_CLIENT_ID variable we received in step 3).
You can now access the managed identity from the workload. Note that to do so, you will need to use an appropriate Azure library to create an object for the credentials.
For example, in python you’ll need to import and instantiate a ManagedIdentityCredential() using the following code:
from azure.identity import ManagedIdentityCredential
credential = ManagedIdentityCredential()
You can then use the credential object in other clients for the Azure API (such as a SecretClient from the azure.keyvault.secrets library).
Google Kubernetes Engine (GKE)
In GCP, you can configure workload identity to federate a K8s service account to a GCP IAM service account. Find the full tutorial for configuring a GKE workload identity here. The service account is assigned permissions using the GCP IAM RBAC paradigm.
Much like the Azure example, these instructions are also mostly in bash so here, too, you need to assign variables with values:
export CLUSTER_NAME=<CLUSTER_NAME>
export COMPUTE_REGION=<COMPUTE_REGION>
export PROJECT_ID=<PROJECT_ID>
Step 1 - Enable workload identity on your cluster
To update and enable workload identity on an existing cluster, run the following command:
gcloud container clusters update ${CLUSTER_NAME} --region=${COMPUTE_REGION} --workload-pool=${PROJECT_ID}.svc.id.googWhen creating a new cluster, keep in mind that autopilot clusters enable workload identity by default. When creating a cluster from the command line, enable workload identity with the following command:
gcloud container clusters create ${CLUSTER_NAME} --region=${COMPUTE_REGION} --workload-pool=${PROJECT_ID}.svc.id.googNote that if you’re using an existing cluster, you should review the section in the GCP tutorial on existing node pools.
Step 2 - Create an IAM service account to federate
Here are the variables you need:
export GSA_NAME=<NAME_OF_GCP_IAM_SERVICE_ACCOUNT>
export GSA_PROJECT=<PROJECT_ID_WHERE_GCP_SERVICE_ACCOUNT_IS>
Similar to the IAM role in the AWS and the managed identity in the Azure, create an identity with which the K8s service account to federate. In the case of GCP, the identity is an IAM service account (yes, the two types of identities are called the same name).
You can create the IAM service account identity with the command:
gcloud iam service-accounts create ${GSA_NAME} --project=${GSA_PROJECT}After you create the IAM service account, bind it to an IAM policy (based on the GCP RBAC paradigm) to grant it permissions that the K8s service account will then use to access GCP resources.
Step 3 - Allow the K8s service account to impersonate the IAM service account
Here are the variables you need:
export NAMESPACE=<K8S_NAMESPACE_OF_SERVICE_ACCOUNT>
export KSA_NAME=<K8S_SERVICE_ACCOUNT_NAME>
Create the IAM policy binding between the K8s service account and the IAM service account:
gcloud iam service-accounts add-iam-policy-binding ${GSA_NAME}@${GSA_PROJECT}.iam.gserviceaccount.com --role roles/iam.workloadIdentityUser --member "serviceAccount:${PROJECT_ID}.svc.id.goog[${NAMESPACE}/${KSA_NAME}]"Step 4 - Annotate the K8s service account
You can annotate the K8s service account via the CLI:
kubectl annotate serviceaccount ${KSA_NAME} --namespace ${NAMESPACE} iam.gke.io/gcp-service-account=${GSA_NAME}@${GSA_PROJECT}.iam.gserviceaccount.comNote: You can also annotate the K8s service account via (test) yaml:
apiVersion: v1
kind: ServiceAccount
metadata:
 name: web-app-service-account
 annotations:
   iam.gke.io/gcp-service-account: <GCP_SERVICE_ACCOUNT_NAME>@<GCP_SERVICE_ACCOUNT_PROJECT>.iam.gserviceaccount.com
Step 5 - Configure deployments/pods
In addition to making sure your deployments/pods use the federated GCP service account, make sure they are running on nodes that use workload identity (with the nodeSelector field).
Both configurations are done under the “spec” section of either the pod manifest (if you define pods) or the “template” object of the deployment manifest (if you define deployments):
spec:
     serviceAccountName: <K8S_SERVICE_ACCOUNT_NAME>
     nodeSelector:
       iam.gke.io/gke-metadata-server-enabled: "true"
You can now make calls to the GCP environment and use the IAM permissions for which IAM bindings exist for the IAM service account with which you federated.
Summary
As noted, the three major cloud providers all offer identity federation for managing access of K8s workloads to resources within the cloud environments. Federating identities is a more straightforward process than you might think, and is a best practice that makes managing access permissions for K8s clusters to cloud resources easier and more secure.
Learn more


Tenable One
Request a demo
The world’s leading AI-powered exposure management platform.
Thank You
Thank you for your interest in Tenable One.
A representative will be in touch soon.
Form ID: 7469
Form Name: one-eval
Form Class: c-form form-panel__global-form c-form--mkto js-mkto-no-css js-form-hanging-label c-form--hide-comments
Form Wrapper ID: one-eval-form-wrapper
Confirmation Class: one-eval-confirmform-modal
Simulate Success